Create a bar chart using React (no other libraries)
Requires moderate experience with React and a bit of SVG
27 July 2018
React is one of the most popular JavaScript libraries for building user interfaces. It's strengths are its component system (allowing an application to be split into manageable parts) and its use of JSX which, in effect, allows you to specify your components using HTML.
There's a great number of charting libraries (e.g. Highcharts, D3 etc.) which are great if you want to quickly get a chart up and running. However, customising them exactly to your needs isn't always straightforward. Also, if you already have a React project, it's not always easy to integrate a non-React charting library.
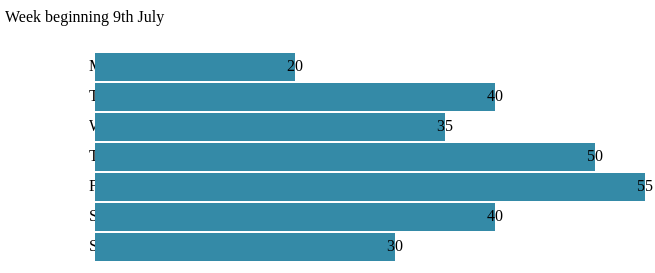
In this tutorial we'll learn how to create this bar chart using just React:
See the Pen React bar chart by Frontend Charts (@frontendcharts) on CodePen.
1. Create project
There's several different ways to create a React based project so either use your usual approach and adapt this tutorial to your particular needs, or follow along on Codepen.
The main thing to make sure is that the two React libraries react and react-dom are included. For example if using Codepen, include these two files:
https://npmcdn.com/react@15.2.1/dist/react.min.js
https://npmcdn.com/react-dom@15.2.1/dist/react-dom.min.js
2. Create BarChart component
Our project will consist of two components: BarChart for the bar chart and BarGroup for a group containing:
- a single bar
- a name label and
- a value label
Let's start by creating a simple BarChart component:
class BarChart extends React.Component {
  state = {
    data: [
      { name: 'Mon', value: 20 },
      { name: 'Tue', value: 40 },
      { name: 'Wed', value: 35 },
      { name: 'Thu', value: 50 },
      { name: 'Fri', value: 55 },
      { name: 'Sat', value: 40 },
      { name: 'Sun', value: 30 }
    ]
  }

  render() {
    return <svg width="800" height="300" >
      <g className="container">
      </g>
    </svg>
  }
}
We can see that we've added an array of data to the state object and our render function returns an SVG element that'll contain the chart.
3. Create BarGroup component
We'll now make a BarGroup component which'll return an SVG group containing a rect element (for the bar) and a couple of text elements (for the two labels):
function BarGroup(props) {
  return <g className="bar-group">
    <text className="name-label">{props.d.name}</text>
    <rect />
    <text className="value-label">{props.d.value}</text>
  </g>
}
We'll need to position the two labels (the name label will go to the left of the bar and the value label at the end of the bar) and size the rectangle:
function BarGroup(props) {
  let barPadding = 2
  let barColour = '#348AA7'
  let widthScale = d => d * 10

  let width = widthScale(props.d.value)
  let yMid = props.barHeight * 0.5

  return <g className="bar-group">
    <text className="name-label" x="-6" y={yMid} alignmentBaseline="middle" >{props.d.name}</text>
    <rect y={barPadding * 0.5} width={width} height={props.barHeight - barPadding} fill={barColour} />
    <text className="value-label" x={width- 8} y={yMid} alignmentBaseline="middle" >{props.d.value}</text>
  </g>
}
Notice that we've defined this as a pure function component.
4. Render BarGroup components
Now let's return to the BarChart component and use map to translate our array of data into an array of g elements each of which contains a BarGroup:
let barGroups = this.state.data.map((d, i) => <g transform={`translate(0, ${i * barHeight})`}>
                                                <BarGroup d={d} barHeight={barHeight} />
                                              </g>)
Note that we transform each g element vertically according to the index i. We also pass the array element d and barHeight as props.
5. Render the BarChart component
We've now ready to render the BarChart component in our webpage. Assuming our HTML is something like:
<div id="wrapper">
  <div id="app"></div>
</div>
we can use:
ReactDOM.render(
  <BarChart />,
  document.getElementById('app')
)
to render our bar chart:
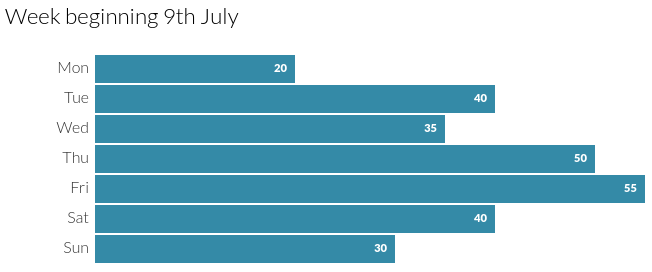
6. Add CSS style rules
No prizes for guessing that we're missing some CSS styling on our bar chart! The main things we need to do are:
- add a nice font (we'll use Google's Lato font)
- align the text labels using
text-anchor - tweak the font sizes
body {
  font-family: "Lato", sans-serif;
  font-size: 16px;
}

.title {
  font-size: 1.4em;
  font-weight: 300;
}

.bar-group .name-label {
  text-anchor: end;
  font-weight: 300;
  font-size: 1em;
  fill: #333;
}

.bar-group .value-label {
  text-anchor: end;
  fill: #fff;
  font-weight: 900;
  font-size: 0.7em;
}
Our chart now looks much better!
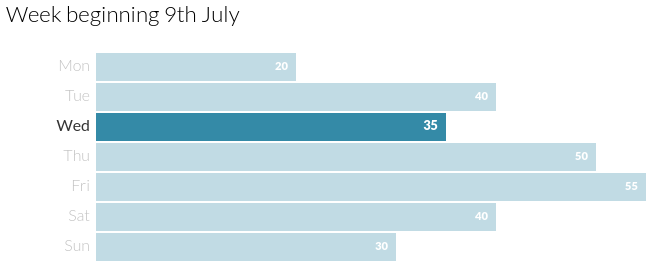
7. Add a hover effect
Finally we'll add a hover effect for when the user hovers their mouse over a bar:
/* Fade bars when the chart is hovered */
.container:hover .bar-group {
  opacity: 0.3;
}

/* But don't fade the hovered bar... */
.container .bar-group:hover {
  opacity: 1;
}

.container .bar-group:hover .name-label {
  font-weight: 400;
}

.container .bar-group:hover .value-label {
  font-size: 0.8em;
}
Now when we hover over a bar the hovered bar's labels change in weight or size and the remaining bars fade:
8. We're done!
This tutorial has shown how a simple bar chart can be created with just React without the use of a charting library. The advantage of this approach is that you have complete control over how the chart looks and also have no issues integrating a 3rd party library such as Highcharts or D3.
Obviously it'll require more effort if you require features such as tooltips, responsivity and transitions but for simple charts this approach may be sufficient.
You can see the complete code on Codepen below.
Code
See the Pen React bar chart by Frontend Charts (@frontendcharts) on CodePen.
Code walkthrough
AI for Data Visualisation shows you how AI can help you explore, transform and visualise your data.
Find out more
Visualising Data with JavaScript teaches you how to build charts and data stories using Chart.js, Leaflet, D3 and React.
Find out more
Data Dashboards with JavaScript teaches you how to build data dashboards using React, Chart.js and Leaflet.
Find out more
Learn the fundamentals of HTML, SVG, CSS and JavaScript for building data visualisations on the web.
Find out more
"One of the best D3 books I've read. The contents are very clear, it is easy to follow and the concepts are very solid."
D3 Start to Finish teaches you how to build a custom, interactive and beautiful data visualisation using the JavaScript library D3.js.
Find out more